Home Home
All Articles
Wakeskate Guide
Discussion Forums
Features
Reviews
Trick Tips
Wakeskating History
Links
Link To Us
Wakeboarding
Wakesurfing
Wakeboards
Wakeboard Towers
Hyperlite Wakeskates
Liquid Force Wakeskates
Byerly Wakeskates
Buy Wakeboards
Ronix Wakeboards
Liquid Force Wakeboards
Buy Wakeskates
Wakeboard Towers
Wakepics
Wake Videos
Complete Longboards
 Article Alert Article Alert

Media Center
Pictures
Videos
Buy Wakeskate Videos

Grip Deck
Getting Up
Dock Start
Ollie
HS Wake Jump
TS Wake Jump
HS Backside 180
BS Pop Shuvit
FS Pop Shuvit
Surface 180 Shuvit
FS Bigspin
TS Shuvit to Indy
Kickflip

Advertise
Contribute Articles
Submit A Trick
Feedback Form
Visitor Feedback
About RSS
|
How to Build a Wakeskate (From Scratch!!)Date: 07-17-2007
Author: Lewis Nelson
View the full photo gallery here.
Read though entire article before purchasing items and starting construction
Materials:
For Press jig
2 8ft 2x4
1 8ft 2x6 or 2x10
1 4ftx8ft sheet of 1/2 plywood
1 Box 1 wood/decking screws
For Board
Birch plywood at thickest 3/16 (Home depot) or 1/8, 1/16 (thinner the better, but more expensive)
West system 105 A Resin (Purchase B for more than one board)
West System 205 A Hardener (Purchase B for more than one board)
Interlux Brightside Polyurethane boat paint (if painted bottom is desired)
Tools:
Skill saw
Jigsaw
Orbital sander
Electric drill/screw driver
Chalk line or long straight edge
Measuring tape
Plastic Disposable mixing cups
Wood paint mixers
3-4 Foam epoxy rollers
1 paint roller handle
Disposable paint trays
2 4 paintbrushes
8-10 heavy-duty wood clamps
Step 1: Design Your Board
Before you do anything you want to research board shapes and sizes. Compare and find one that best suits you. You can have a blown up copy made which will be used for a trace when cutting out your board. Other things to note are lips (the top rim which cups the riders foot in) and channels (the cut out section on the base in which the water flows through). The average board is in the low 40 and high 30 region. I chose to make mine a 40 board, and I hand drew a layout similar to a Cassette wakeskate. You also want to note how much rocker (measure of the upward curve of the board) you want. Most wakeboards are about 3 and wakeskates tend to be 2 2.5. I am a more aggressive rider and gave mine a 3 rocker.
Step 2: Build a Jig
In order to get the rocker shape you need to layer a few sheets of plywood on top of each other (with epoxy in between) on a jig or Press that is curved in you rocker shape. Cut the 8ft 2x6 or 2x10 in half. These will be the side walls for the jig. Trace the side of the board or rocker curve on the 6 or 10 side of one of the 4ft pieces. NOTE: the board will not flex back with the amount of epoxy you will use so make the rocker what you want it to be in the end. Use the jig saw to cut it out. Then take either the bottom or the top of the cut piece and trace it one the other 4ft piece so that the two will be identical.
To make the supports for the sidewalls cut the 2x4 into 22 ½ pieces (1 ½ off to account for the side wall-in order to make it a 2ft by 4ft jig). I used five evenly spaced on both the top and bottom. It is important to get them as flush as possible to the cut surface in order to give the jig even pressure. Attach with the wood screws firmly (suggest two screws for each support on each side. NOTE: both sidewall cuts may not be the exact same, so keep them together and fashion them facing the same direction). This will help keep the jig square which will prevent you from having a twist (or warp) in your board. Make sure both the top and bottom are square by measuring the diagonal lengths.
Cut out the ½ ply wood to cover the ribs of the jig. Remember the curve of the sides will make it necessary to add more length to the plywood sheets so cut appropriately. Fasten down with the wood screws, and make the screws flush to the surface; the tighter the better. At this point the top piece and bottom should fit relatively close together. If there is a large gap you may have flipped the sidewalls, leading them to be mismatched. The clamps will take out slight gaps. If you find it necessary, take a planer to the plywood and take out slight bumps that create gaps.
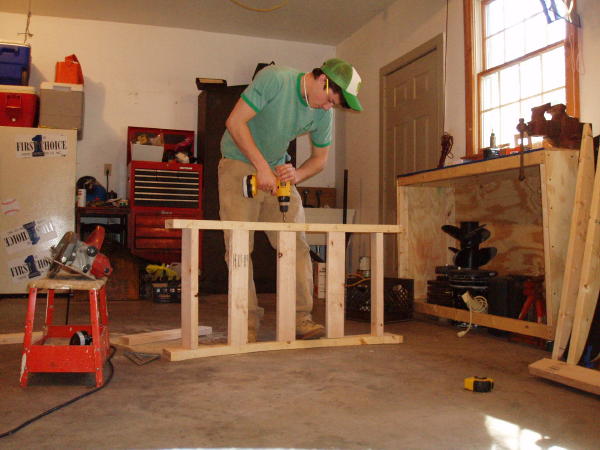
Early press construction, beginning with the rips of the jig.
Step 3: Lay the Base
This part takes a lot of planning because it is responsible for the size, shape and type of board you make. First choose your wood. If you are on a tight budget I found that going to you local Home Depot or Lowes will save you some cash. You can purchase some 3/16 Luan plywood (birch). This wood is cheap and not high quality but it will do the job and will actually create a stiffer feel if so desired. I chose to order 1/8 Birch ply. This is much more expensive, like $38 a sheet. Keep in mind a 4ft x 8ft sheet will make one board. Unless you are making a few boards you will only need one sheet.
Next you want to take you designs and check one last time to make sure thats what you really want. Then you can start cutting the sheets. I chose to make a board that was 15 ½ wide at center and 40 tip to tail. In this case I measured out 17 wide by 48 long sheets. I got 5 sheets with a little extra. There are a couple of things you can do to imitate the compression formed boards. For a lip around the top, cut a round strip that follows the outline of the board. I made it an inch wide on my design. For channeling on the bottom, cut two strips that will glue to the outsides of the board and run length ways with a gap for the water to channel through in the middle. If you decide to make a basic board use 4 full (17x 48) sheets of 1/8 ply. Use 3 sheets of 3/16 Luan. If you decide to make a complex board use the 1/8 ply so it doesnt get too thick. If you only want to add the lip on top, use 4 sheets with the lip on top, and if you go with the lip and channel use 3 full sheets with the lip on top and the channel slats on the bottom.
Next you want mix the epoxy. If you get the correct pumps, they will ration it correctly and you will only have to count the out the same amount of pumps as you mix (consult the west system dealer for more information: West Marine). Apply a coat to each side of the sheets (except for the top of the top sheet and the bottom of the bottom sheet). Line the sheets flush and put them on the bottom of the press. Place the top on and apply the clamps. It's important to get solid clamps in order really press and squeeze out the air out. Leave the board to cure. It will most likely take 24 hours before you can take it out.
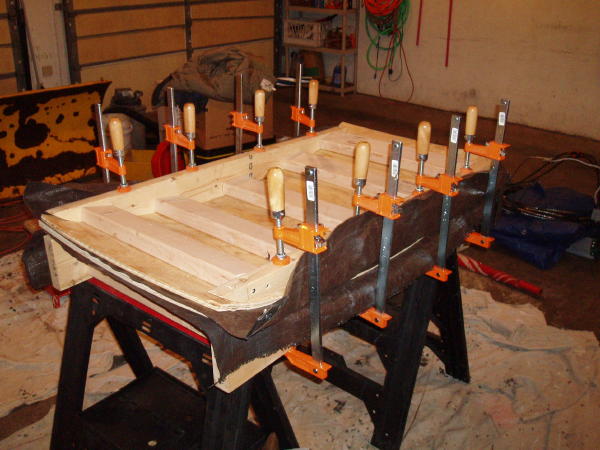
Board press...
Step 4: Cut and Shape
Now that the board is cured take of the clamps and take the board out. Trace the shape you want out on the bottom of the board, which will make it easier to cut. Then use the jig saw and cut the board out. Mark and drill your holes for your fins. (Mark in compliance to whatever fin you bought.) The best way to make them parallel is to make a centerline length ways down your board.
If you want to add a lip to the top, take another 2x4ft sheet and trace and cut the board shape out. I chose to make a single layer lip. I found the best width was about 2 inches. Make a tracing jig by poking two holes (two inches apart) in a piece of cardboard. Insert pencils in both. Make one hang down longer than the other and use that to fence along the edge of the piece you cut out for the lip. Use this to trace the width of the lip. Cut the lip out, and epoxy the under side of the lip and the top of the board, (where the lip will sit) and press in the jig.
If you want to add channeling to the bottom as well as a lip to the top make the original board one sheet thinner so that the board doesnt end up too thick. Trace the cut board out onto a 2x4ft sheet and cut out. Cut the sheet in half but with a 3-5 gap. This gap will create the channel. Apply both pieces to the board with epoxy like the lip and press. To save time press both at the same time. Do your best to line up the edges of the pieces to save time sanding.
When this is done, sand down the edges of the board to make a nice smooth curve. Note. Only round or bevel the top edge of the board. The bottom one should be a sharp edge for a good cut in the water. Sand the entire board with fine grit sand paper. The sanding process goes much faster with an orbital sander.
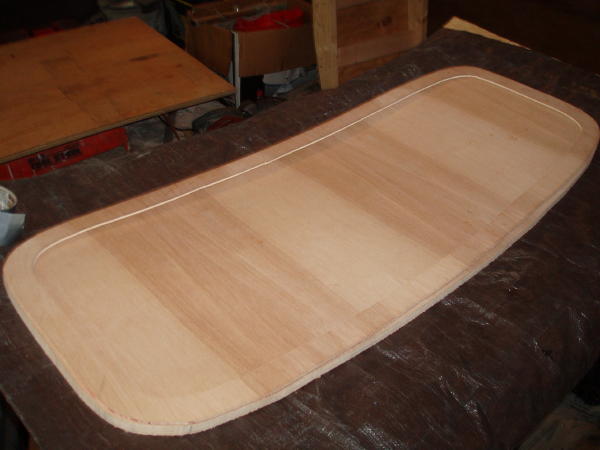
Handmade wakeskate with a lip...
Step 5: Glass It Up
Now that the sanding is done take damp rag and wipe it down to remove dust. Mix up a batch of epoxy to coat the entire board (6-8 pumps should suffice). This step will water proof the board. This is best done if a screwdriver is inserted through a screw hole with string tied to either side of the screw driver and then suspended so the board is hanging. This makes it so that both sides can be coated at the same time. Coat lightly to avoid dripping.
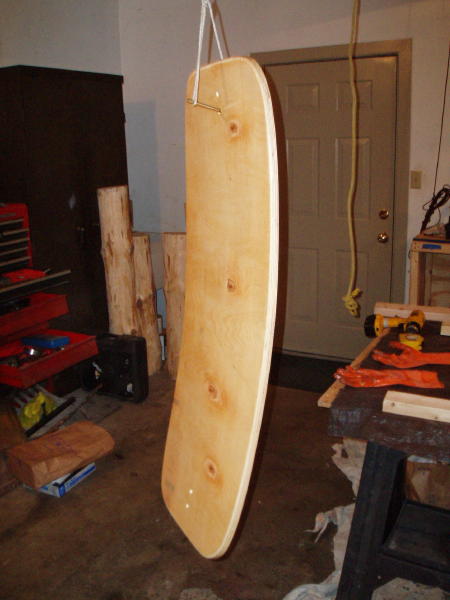
Hang your wakeskate while allowing the epoxy to cure.
Step 6: Gripping and Graphics
To paint the bottom of the board go to a boating store like West Marine and choose whatever color you want of Interlux Brightside Polyurethane boat paint. Dont try using spray paint because it will react with the epoxy and create wrinkles. Spread a thin even coat and let cure for 16 hours. You can get creative by taping off areas with painters tape and using two or more colors. Another option is to leave the epoxy and wood showing.
For the top of the board the best solution is to use grip tape. Because the board is longer and fatter than a skateboard, you may not be able to pick up what you need at a local skate shop. Some skate shops will cut custom lengths, which will save some money. If that is not an option, buy a roll of grip tape. This will most likely have to be done over the Internet. The rolls are usually 9 inches wide and 60 feet long. Find the center of the board and mark a line length ways down the middle. Make two more lines, one on either side about 1/8 from the center. These lines will be where you apply the pieces of tape. Cut two pieces a little bit longer than your board and apply to the outer lines making a ¼ gap between the pieces. Turn the board upside down on top of the top of your pressing jig. Take a razor blade and cut along the edge of the board. Flip the board over and firmly pres the tape on. Now add the fins and you're ready to ride!
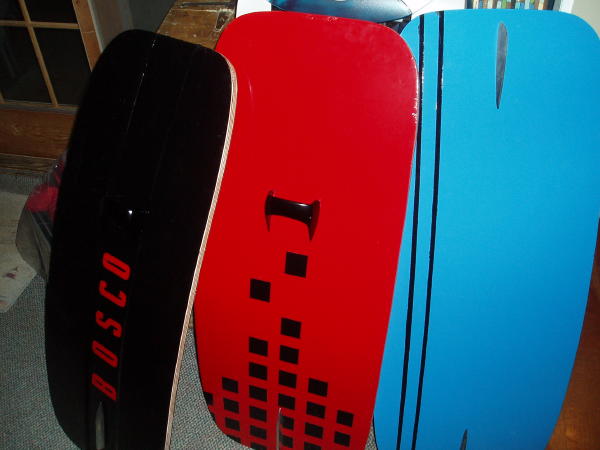
A completed quiver of handmade sticks.
Shop For Wakeskating Gear  Proline LGS Wakesurf Package Proline LGS Wakesurf Package
Liquid Force 2018 Trip 142 Wakeboard
Scene One Productions Fun Boots - DVD
|
|

Wakeboards
Ronix Wakeboards
Hyperlite Wakeboards
Liquid Force Wakeboards
Slingshot Wakeboards
CWB Wakeboards
Wakeboard Bindings
Ronix Bindings
Hyperlite Bindings
Liquid Force Bindings
Slingshot Bindings
CWB Bindings
Wakeboard Packages
Wakeskates
Wakesurf Boards
|