Home Home
All Articles
Wakeskate Guide
Discussion Forums
Features
Reviews
Trick Tips
Wakeskating History
Links
Link To Us
Wakeboarding
Wakesurfing
Wakeboards
Wakeboard Towers
Hyperlite Wakeskates
Liquid Force Wakeskates
Byerly Wakeskates
Buy Wakeboards
Ronix Wakeboards
Liquid Force Wakeboards
Buy Wakeskates
Wakeboard Towers
Wakepics
Wake Videos
Complete Longboards
 Article Alert Article Alert

Media Center
Pictures
Videos
Buy Wakeskate Videos

Grip Deck
Getting Up
Dock Start
Ollie
HS Wake Jump
TS Wake Jump
HS Backside 180
BS Pop Shuvit
FS Pop Shuvit
Surface 180 Shuvit
FS Bigspin
TS Shuvit to Indy
Kickflip

Advertise
Contribute Articles
Submit A Trick
Feedback Form
Visitor Feedback
About RSS
|
Re-grip Your Skate With Leif ErkkilaKampus Wakeskates team rider, Leif Erkkila, explains how to put new grip tape on your wakeskate. For the most part, it is a simple process if you know the tricks of the trade. A razor blade and a steady hand is required to
complete the job. If you don't think you are old enough to handle a razor blade, please ask an adult to give you a hand (Wakeskating.com, Kampus Wakeskates and Leif Erkkila are not responsible for any cuts, scrapes or stabs). Re-gripping your deck will need to be done from time to time as your grip wears down and becomes slippery.
Brought to you by:

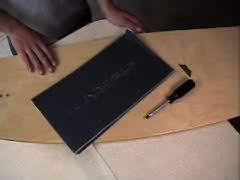
Supplies Needed To Re-grip Your Deck
Wakeskate without grip
Grip tape
Screwdriver
Razor blade
A steady hand and/or adult supervision
Watch The Video
Re-grip Your Skate - (Quicktime File 3.11MB)
Re-grip Your Skate - (Windows Media 2.31MB)
Instructions To Re-grip Your Wakeskate
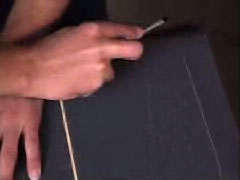
The first step is to measure out your grip to the length of your board. If you want to cut it up and make some crazy designs, now is the time to do so. In this example, Leif is using several pieces of grip and has cut out the Kampus logo in the middle piece. Get creative! Be sure that the width of the grip goes past the edges of your board at least an inch to an inch and a half.
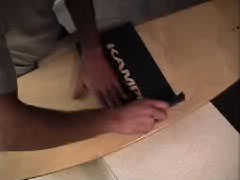
After you get an idea of how you want to lay out your grip, remove the backing and slowly lay the grip down in place on your deck. Be careful not to allow any air bubles to form as you lay the grip down.
After you have your grip laid down, use a screwdriver to get the grip to stick on the edges. Hold the metal shaft of the screwdriver against the edge of the board firmly and slide it back and forth. You will start to see an outline of your board as you work your way all the way around the deck.
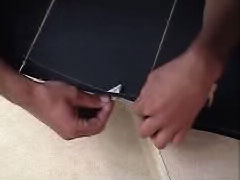
The next part is the hardest part of the entire project. With a sharp razor blade, you will have to cut off the excess grip that is hanging over the edges of your deck. Make a cut into the grip and slowly push the blad towards the board until you can follow the edge. Slowly follow the outline that the screwdriver created while trying to stay as close to the edges of the board as possible. Go very slow around the cornors as they can be tricky.
After you cut off the excess grip, poke out the fin holes if you want and you are done. You can put your board on the ground and walk around on it to make the grip stick to the board completely. You new grip is now finished and your board is ready to ride. Giving the glue a little while extra to dry would definitely help the grip stick better, but you could get away without doing it.
To find out more about Kampus Wakeskates, visit them online at www.kampuswakesk8.com.
Shop For Wakeskating Gear 
|
|

Wakeboards
Ronix Wakeboards
Hyperlite Wakeboards
Liquid Force Wakeboards
Slingshot Wakeboards
CWB Wakeboards
Wakeboard Bindings
Ronix Bindings
Hyperlite Bindings
Liquid Force Bindings
Slingshot Bindings
CWB Bindings
Wakeboard Packages
Wakeskates
Wakesurf Boards
|