Home Home
All Articles
Wakeskate Guide
Discussion Forums
Features
Reviews
Trick Tips
Wakeskating History
Links
Link To Us
Wakeboarding
Wakesurfing
Wakeboards
Wakeboard Towers
Hyperlite Wakeskates
Liquid Force Wakeskates
Byerly Wakeskates
Buy Wakeboards
Ronix Wakeboards
Liquid Force Wakeboards
Buy Wakeskates
Wakeboard Towers
Wakepics
Wake Videos
Complete Longboards
 Article Alert Article Alert

Media Center
Pictures
Videos
Buy Wakeskate Videos

Grip Deck
Getting Up
Dock Start
Ollie
HS Wake Jump
TS Wake Jump
HS Backside 180
BS Pop Shuvit
FS Pop Shuvit
Surface 180 Shuvit
FS Bigspin
TS Shuvit to Indy
Kickflip

Advertise
Contribute Articles
Submit A Trick
Feedback Form
Visitor Feedback
About RSS
|
Customize Your Wakeskate Graphics By: Sim Bradley By: Sim Bradley
Date: 02-05-2004
With so many people riding the same brands of boards these days, it's hard to retain any individuality on the dock. Sim Bradley, British wakeboard, filmmaker from Revert Films has a way you can express yourself not only through riding, but with your board's graphics as well. After all, it's the shape of the board that matters, not what companies name is on the bottom.
To make your own graphic's using a stencil, you will need the following:
White spray paint
Your chosen color spray paints
Rough sandpaper
Newspaper, masking tape and a knife
Blue-Tac
Computer & printer or a good drawing hand
The hardest exterior wood lacquer money can buy
Stage 1
First of all, you must roughen the surfaces on your skate with the sandpaper. You only want to go over it for a minute. Don't try to take the old paint off, that will make the board smooth, and spray paints stick better to a rough surface. If you ride without fins and on a wooden board, I would advise you to fill the holes in your deck with wax. This will stop water from getting between the sheets of ply and warping the shape of your board. This is a common problem with all wooden skates, as manufacturers never lacquer inside of the fin holes. To do this, put a strip of masking tape over the holes on the grip tape side of the board. Now light a candle and drip the melting wax into the holes on the base. Leave it for five minutes so it can cool down. Remove the tape and then scrape the base to make sure the wax is flat.
Stage 2
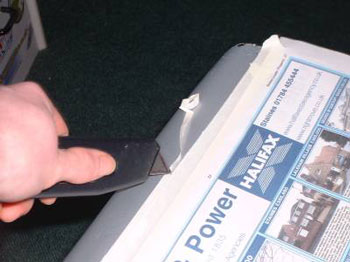
Now you must cover the grip tape with newspaper if you are not changing it. If you are replacing the grip as well, then peel off the old grip now, remove all of the glue and then ove on to stage 3.
To cover the grip completely, you must first of all cut a sheet of newspaper to fit inside of each piece of grip tape. Now with the masking tape, cover the edges of the grip. Dontt try to be tidy against the edges. Stick the tape in 8 inch sections if the sides aren't straight, and go over onto the wood. When everything is covered, run your fingernail along the edge of the grip tape, pushing into the ridge. Once this is scored, take a knife and run it around the edges of the grip, this will make a clean edge, and if done correctly, will stop excess paint leaking through onto the edges of the grip tape.
Stage 3
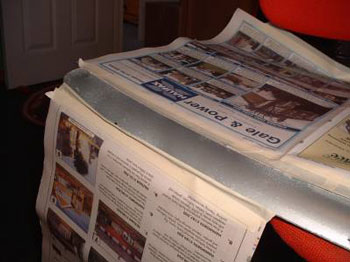
The next step is to prime the board. If you don't do this, when you spray your main colors on, the old graphics will show through. So spray your board completely white to give a clean undercoat. You will have to paint the deck in halfs, as you must lay the board down on something to paint it. If you can still see a bit of the old graphic through the white, then give it a second coat.
Stage 4
If you want to have different colors on the top and base of your board, then you should now make a "curtain" with newspaper and masking tape. This will give you a straight line on your edge, and stop any excess paint getting on the wrong side.
Now paint one side of your board with your chosen color. Two coats are usually needed to make the color stronger. Once this is dry, take off the "curtains", turn your board over, and repeat stage 4 with the other side.
Stage 5
If you are making a stencil, then you are best off using a computer to print it, but you can draw it, it all depends on what design you want.
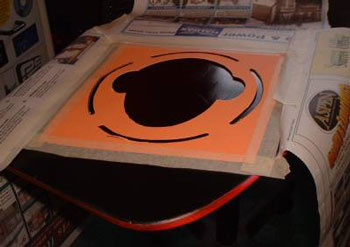
With a computer, create your stencil using a desktop publishing program, and if you want to make it large, then print it on a number of pages and stick them all together. Cut out your stencil carefully with a knife, and stick each part together if required. Now you must begin the long and tedious task, of sealing the edges of you stencil to stop paint spilling out.
Take the "blue-tac", and roll small, long pieces and stick them around the inside edge. Make sure that they are as close to the edge as possible, but stuck flat so that paint can't get under the stencil. Stick more newspaper around the outside of your stencil with masking tape to make sure the rest of your base is protected. Now spray your graphic on (two coats will be bolder).
Stage 6
When the paint is dry, remove the stencil, blue-tac, newspaper and masking tape. Now your graphic should be complete. All that is left to do is protect the paint, and more importantly, give the skate a tough exterior. Take the hard lacquer, and paint it all over your board. If you have a wooden skate, I would advise doing two or three coats, as sliders and kickers can crack through lacquer surprisingly easily, especially on the sides.
Now your wakeskate should be finished and looking quite impressive. Give the lacquer about three days to really set well, despite whatever the directions say. Remember you are using it in special circumstances that it's not specifically made for. After this, go to the lake and tear up your new customized wakeskate. You will be surprised how many heads youll turn!
Sim's company, Revert Films will be releasing the first ever British wakeboard and wakeskate film around the UK in July 2004. It will be available in the US by ordering direct from Revert Films. For more info, check out the website, www.revertmusic.co.uk or email info@revertmusic.co.uk.
Shop For Wakeskating Gear  Sidewayz Blackout - DVD Sidewayz Blackout - DVD
|
|

Wakeboards
Ronix Wakeboards
Hyperlite Wakeboards
Liquid Force Wakeboards
Slingshot Wakeboards
CWB Wakeboards
Wakeboard Bindings
Ronix Bindings
Hyperlite Bindings
Liquid Force Bindings
Slingshot Bindings
CWB Bindings
Wakeboard Packages
Wakeskates
Wakesurf Boards
|